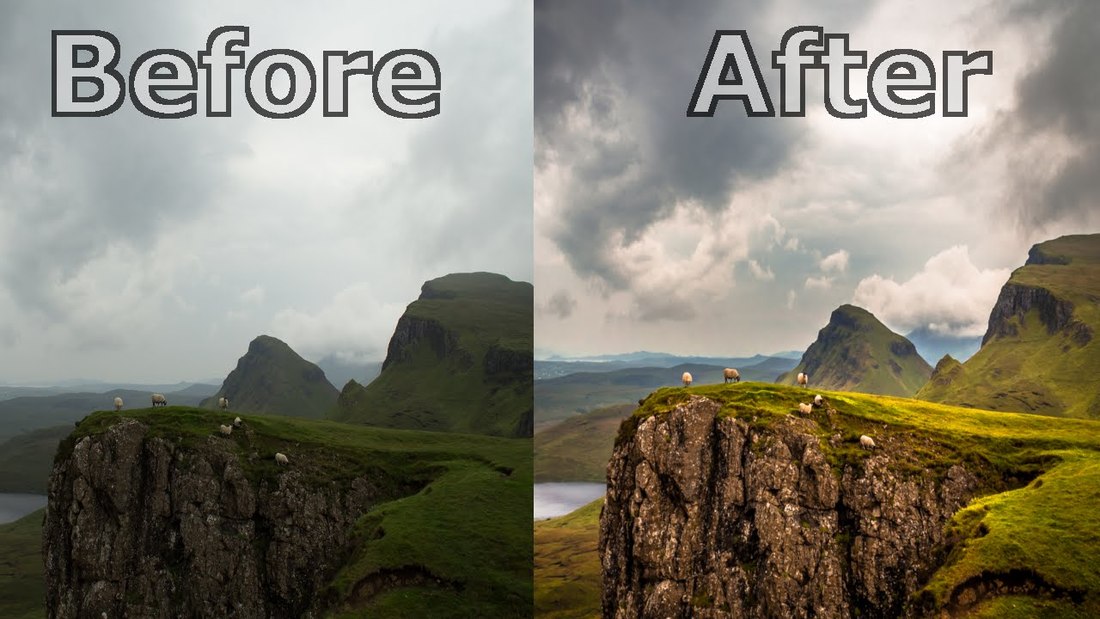
 I will now take a Photograph from my Lightroom Library that has had basic edits applied and bring it into Photoshop for a text layer, an added half moon and then back to Lightroom. This is a simple image of a nice sky with silouetted trees in the foreground. We will add “Summer 2016” beneath the Sunset in dark area of the image and a moon somewhere in the sky.
JUST SOME QUICK TEXT AT THE BOTTOM TO COMPLETE THIS FILE. By hitting CMD (Or CTRL on PC) & E, the current file will be sent directly to Photoshop. When working with RAW files, all your edits in Lightroom will be visible in Photoshop. When editing NON RAW files, Lightroom will ask if you want to Edit the Original File or a Copy of the Original. This is important because sometimes we want to go back into Photoshop even after coming back to Lightroom. At that point, it would be a TIFF file (according to our settings). ONE IMPORTANT thing to remember when saving your files back to Lightroom is to always CLOSE THE FILE in Photoshop (photoshop online) once saved into Lightroom by hitting CMD/CTRL & W. The file will close immediately when doing this UNLESS further changes were made after the initial save. THIS IMAGE, A SCREEN SHOT, SHOWS THE LAYERS USED IN THIS VERY SIMPLE DEMO AND MORE IMPORTANTLY SHOWS THE STACKING OF THE NEW FILE RIGHT NEAR THE ORIGINAL IMAGE INSIDE LIGHTROOM. The layers shown are only there because I did a screen capture of just the layers panel and pasted it to the image just to show the layers used. This file was saved with all the layers so it could be opened again as the original TIF and you’d have access to everything except the HISTORY states within Photoshop, Once the file is closed, the History states are wiped out. Source: internet
0 Comments
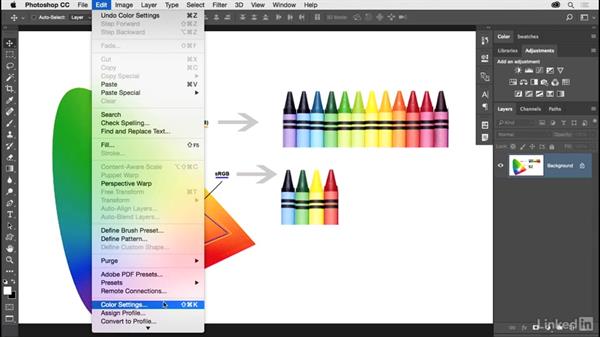 After making the RAW file edits in Lightroom, we select from the PHOTO menu option “EDIT IN > Photoshop CC ### (Current Version)” or simply hit CMD or CTRL E to send the file to Photoshop. Now once here, it is imperative that we have Photoshop set up to accept the file into the working area with the proper settings.
They are as follows: For the Working SPACES, under RGB, set it to ProPhoto RGB. You can leave CMYK set to this setting – we are not concerned with this right now (You may want to contact your commercial Printer to ask which setting they recommend). GRAY can be set to 1.8 because this is what has been recommended as the best option when working with ProPhoto RGB. Sean Bagshaw is a top photographer who recommends this in his training series dealing with Luminosity Masking. Color Management Policies can be set as such but it is personal preference if you are asked when Opening or Pasting. Under Conversion Options Engine set to Adobe (ACE) is to be left this way. Intent is set to Relative Colorimetric by default and that’s fine for graphics and design work but for continuous tone photographic images, Perceptual is the best setting to use, especially in regards to digital photography. Those are all the settings you need for Lightroom and Photoshop to work together in perfect harmony in a professional RAW, 16 BIT workflow. Source: internet If u need a free photoshop alternative that give you a productive solution, photoshop online will be a great option. Web: http://photoshopalternative.com  For the file format, you will have two choices:
TIFF (Tag Image File Format) or PSD (Photoshop Document). This seems like a no brainer since we are working with two Adobe Products and Photoshop happens to be one of the Applications we are working with. Logic says to use PSD, right? Logic be damned! Adobe Engineers themselves have suggested, along with other leaders in the industry, that the best file type to use is the TIFF file format. When you choose PSD, you are warned how PSD files can be less efficient than TIFF files with respect to metadata updates. Also, make sure “Maximize Compatibility” checkbox is clicked on. But why bother with all of this?!? Save yourself the headaches and use the TIFF file format. All of your layers will be saved and in tact for further processing down the road. source: internet If u need a free photoshop alternative that give you a productive solution, photoshop online will be a great option. Web: http://photoshopalternative.com 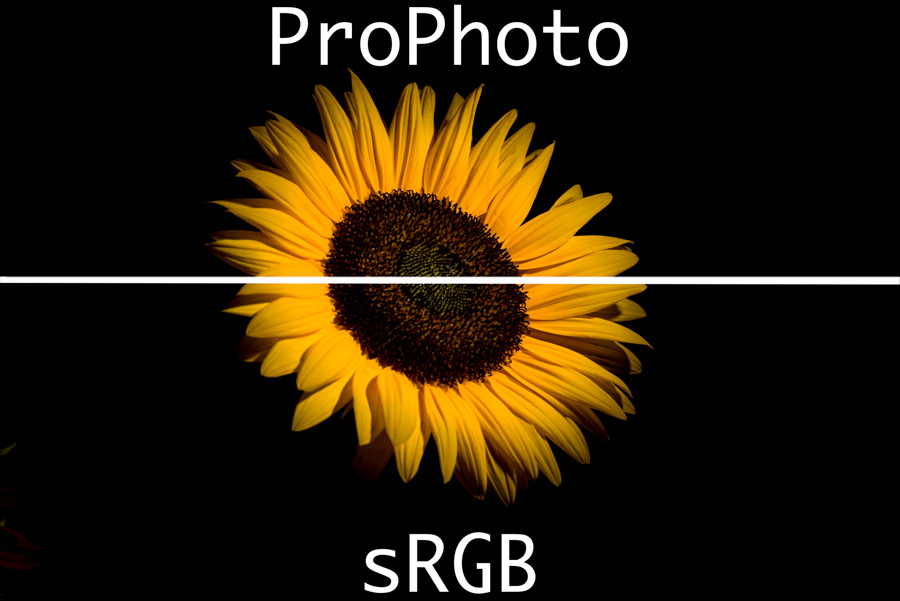 When you import a RAW file into Lightroom’s catalog (And you should be shooting RAW!), there isn’t any option for you to choose which color space you will be working in. When we edit RAW image data in Lightroom’s Develop module, the software is working in a color space very close to ProPhoto RGB. It is a variation which is called Melissa RGB and the technical differences or similarities between the two are outside the scope of this article. Simply put, Lightroom is working in the ProPhoto RGB color space for all we are concerned – the widest color space available. Widest simply means the most colors. And in this case, we are talking MILLIONS AND MILLIONS AND MILLIONS! In fact, many of these colors are “theoretical” and scientific – the human eye cannot even distiguish many of these colors.
That being said, it is very simple and understandable that we want to use ProPhoto RGB as the color space. Why would we not want the most available colors to work with? It is true that the WEB and most of our displays, even the high Resolution Apple Retina displays, are sRGB displays. They don’t have the wide color gamut of Adobe RGB and certainly not the millions upon millions of colors that ProPhoto RGB contains. So why not select sRGB? The answer to that is – WHY would you? The file is the file. We aren’t exporting this to the web or print just yet. So it is best to keep all those colors even though we cannot see them. Remember, when you export your files from LIGHTROOM to the web, you THEN have the option to export to sRGB and at that point you probably should since the WEB works in sRGB and many printers work best with sRGB files. This is changing, however, as many 8 and 12 ink printers now offer color gamuts that are greater than even the Adobe Color Space. The more saturated the colors, the bigger color change you will notice when exporting out to file and sRGB (explained later). Eventually, through technology, we will hopefully have displays and printers that will display and print ProPhoto for the full color range available. But what we are discussing here is bringing the RAW file with edits applied to a PIXEL based editor so we want all the information, including color, as we can get. After all, if you work on a file ONLY in Lightroom and export it, you’re basically working in ProPhoto and then putting it out to file. Here is an example. This contains a layer on top that was exported to Photoshop with ProPhoto Space (TOP) and sRGB (Bottom). You will be hard pressed to tell the difference here. When in Photoshop, you can just barely see the ProPhoto file as having slightly more color – especially in the rich and saturated colors. Here, with strong compression, it may not be possible to see any difference. Which begs the question – why not just use ProPhoto Color Space? You should! Source: Internet Our web: http://photoshopalternative.com If u need a free photoshop alternative that give you a productive solution, photoshop online will be a great option.  1. photoshopalternative.com
You can completely finish online and this free photoshop online. You just have to be connected to the internet from anywhere in the world. If you do not want to slip a single penny out of your pocket and still have all the benefits that Photoshop Alternative is perfect for you. However, you must keep in mind that your edit ought to be simple of sorts. If you add too many layers, it might end up spoiling the output. Otherwise, it consists of all the effects and filters that other software consist of.
Pixlr is a web based editing tool which you can completely finish online and this best free photoshop alternative. You do not have to install any software. You just have to be connected to the internet from anywhere in the world. If you do not want to slip a single penny out of your pocket and still have all the benefits that Photoshop Pixlr is perfect for you. However, you must keep in mind that your edit ought to be simple of sorts. If you add too many layers, it might end up spoiling the output. Otherwise, it consists of all the effects and filters that other software consist of.
Paint.NET is best photoshop alternatives software for free. The Paint tool that is a part of Windows package, which we all love using for doodling and other purposes, has its roots in Paint.NET. It is known as a heavier and better version of the Windows Paint tool. There are many similar features too. However, it is not very rich and powerful in terms of editing. To increase its capabilities, you can use the assistance of plugins. Otherwise, it has layers and other basic editing features. To come up with something neat and elegant, go for Paint.NET.
 Illustrator is a program used to create vector based art. A vector is a quantity that has magnitude and direction and that is commonly represented by a directed line segment whose length represents the magnitude and whose orientation in space represents the direction. I know that definition sounded extremely complicated, but the basic idea is that vector graphics use mathematical calculations to create art. Don’t worry, I didn’t really understand it at first either, but I promise it’ll make more sense once you keep reading. In vector art, the computer uses a system of math to make sure artwork stays sharp and clear no matter how large you scale it. The technique used to create artwork is very similar to the way you would create artwork in Photoshop. Although vector art is created using a mathematical algorithm, the user doesn’t need to know or really understand that algorithm. The computer takes care of all the hard work and does all the math for you. If you have a digital drawing tablet, you can draw your artwork just as you would on a piece of paper. The important concept to remember is: vector art can be scaled infinitely and maintain clarity, but pixel based artwork cannot.
What Is Illustrator Used For? Illustrator is used for making art that needs to be produced at a variety of sizes. Logos and branding are to most common uses for Illustrator, because they need to be scaled up and down to fit the size of the product. Logos can appear on objects as small as business cards and as large as billboards on the highway. Vector art isn’t just limited to logos though. Most large scale printed media contains vector artwork. This could include: posters, banners, clothing designs, window decals, and flyers. Like Photoshop, Illustrator has several uses. Many artist and designers use Illustrator to create resumés, mobile application layouts, ebooks, brochures. comic books, magazines, etc. The possibilities are only limited to your imaginations and creativity. The uses for Illustrator can be very similar to those of Photoshop, the distinction comes from Photoshop being a pixel based program and Illustrator being a vector based program. Photoshop And Illustrator Make A Great Team?Each program can create some amazing things, and when you combine the power of Photoshop and Illustrator you get incredible works of art. The primary reason to combine Photoshop and Illustrator is to give your vector artwork a new level of dimension. There are some special effects such as glows, drop shadows, and 3D included in Illustrator, but they’re very primitive compared to the tools available in Photoshop. Ideally, you would create the basic artwork in Illustrator; then import that artwork into Photoshop to enhance it. You may want to add true 3D to a character you created in Illustrator, or you may want to give some food you created a more realistic look. Photoshop provides a way to truly refine your vector artwork. Source: Internet Refer online photoshop editor free : http://photoshopalternative.com Other news:  T-shirt design
I bet this never occurred to you. There are numerous tutorials online that teach you how to utilize Photoshop to design print for T-shirts. Many people are aware of Photoshop’s ability to create web-content and logos, but there are always new ways to apply this versatile tool. Using Photoshop to create these designs yourself gives you license to create something to your exact specifications and control every step of the design process. Old photo restoration Old photographs are beautiful, but unfortunately they fade over time. Luckily, tools like the healing brush, patch tools, clone stamps, sharpening tools, among others allow for the refreshing and recreation of these photos. Whether you’re editing these photos for the purpose of advertising, your employer, contract work, or for personal use you’re sure to restore memories to mint condition. Web Design There are a lot of tools out there that are meant specifically for web design, but Photoshop is the most versatile tool on the market. Photoshop is built with all the tools you need for successful design work for the web—no extra work necessary. Grid systems, custom document presets, customized defaults, crisp vectors, easy dotted lines, text wrap, color fill, shortcuts, and more allow you to manipulate every aspect of your creations. Few other programs let you edit and design on such a detailed level without requiring extensive skill and practice. Source: Internet If u need a free photoshop alternative that give you a productive solution, photoshop online will be a great option. My web: http://photoshopalternative.com Use free online image editing tools that make your life easier! “Online” means you won’t have any extra tools to download apart from your browser. All of those tools can also be free and All them are very easy to use Some times you will need merely tweaking a picture a little, resize it or change a few features. Ordinarily, you’ll not like opening Photoshop for tinkering such minor issues. You will need some lightweight, fast and one that allows you customizing your images and photos on the go. The good news is that today you can find tons of online image editing software and graphics editing tools that require you just opening your browser and uploading your pic.  your life easierUse free online image editing tools that make your life easier! “Online” means you won’t have any extra tools to download apart from your browser. All of those tools can also be free and All them are very easy to use
Some times you will need merely tweaking a picture a little, resize it or change a few features. Ordinarily, you’ll not like opening Photoshop for tinkering such minor issues. You will need some lightweight, fast and one that allows you customizing your images and photos on the go. The good news is that today you can find tons of online image editing software and graphics editing tools that require you just opening your browser and uploading your pic. Whether you’re looking for a full photoshop online alternative that gives you total manual control over every aspect of your images, or a simple Instagram-style editor that offers a selection of one-click filters, there a free editor that fits the bill. The sheer number of free photo editors available to download can be overwhelming, so we’ve rounded up the very best options to help you pick the one that’s right for you. On the web editing photo tools, easy to use and all purpose online tools, services and applications that will help you tweaking images and photos for your web site without any attempts. Web online photoshop free: http://photoshopalternative.com Photoshop is tool photos edit but it costs money. Now, you are plenty of completely online photo editor Alternatives to Photoshop. The only thing you need to do is the computer running Adobe Flash Player. So it won’t work in mobile web browsers, but it’s a solid choice for desktop-bound photographers.  The Photoshop Alternatives uses the most basic features of Photoshop. The app lets you crop, rotate and resize pictures, adjust the usual variables like brightness and contrast, and remove red-eye. There’s also a useful Touchup tool that lets you correct minor blemishes in your pictures.
Upload a photo and you’ll be presented with a tabbed interface. The Basic tab contains everything you need for quick jobs like resizing, cropping, rotating, flipping, and adjusting contrast, brightness, hue and saturation. There’s also a one-click optimization tool to give washed out pictures a quick boost, and a red-eye corrector. Stickers, and simple drawing tools. Beautify includes smoothing and sharpening tools, a healing brush and a wrinkle remover, and the distortion tab contains a set of simple liquify tools. Those might prove handy, but the really interesting stuff is tucked away under the last tab. Online Photoshop Free: http://photoshopalternative.com News other: Initial use Photoshop Online AlternativeBlur Tool and Spot Healing Brush in Photoshop Online Alternative5 Photoshop Tricks for BeginnersThe Photoshop Online Alternative requires Adobe Flash PlayerAlternative is online photoshop free editor Photoshop Alternative is used application for editing images. Get started with it is understanding its interface and its tools panel. This post you a comprehensive guide of how to use each and every single tool in the tools panel. You will get hands on experience on how to use each tool and its various options. It is suitable for any photoshop online user who needs to improve in the knowledge of the tools panel, and those who are curious to know the extra features a tool has apart from its default.  Launch Photoshop Alternative
Photoshop Alternative requires Adobe Flash Player, you’ll need to quickly download and install the free Adobe Flash Player. Open a new images Command+ click (Windows:Ctrl+click) here to open a sample picture in a new tab. You can use to follow along with this tutorial. Drag the photo to the desktop, then open up that image in Photoshop. The Marquee tool The Marquee tool is the most basic of all tools. It’s something you’re already familiar with: virtually every application and operating system selects things the same way: click and drag to select a region of the screen. screen. Photoshop is no different. Clicking and holding on the Marquee icon will give you a small popup menu where you can select the variations. Then place your cursor somewhere in the upper left of the image, then click and drag the mouse. From here, you can copy the selection, move it, apply filters to it pretty much anything you can do in Photoshop starts with a selection. The Lasso Tool With the Lasso tool, you can make a freeform selections. Click and hold the mouse button, then draw a selection around the small white sailboat that’s left of center in the window. When you get to the bottom, release the mouse button the selection will auto complete. Notice as you move your mouse, the starting point remains pinned, and a dashed line extends towards the cursor. Click again, and that next point becomes pinned. You can continue clicking until your selection is complete: as simple as a triangle, or as complex as you like. When you reach your last click point, double click instead of single click, and the polygon will automatically close. Web: http://photoshopalternative.com News other: Blur Tool and Spot Healing Brush in Photoshop Online Alternative5 Photoshop Tricks for BeginnersThe Photoshop Online Alternative requires Adobe Flash PlayerAlternative is online photoshop free editorGuide use online photo editor |
Photoshop OnlinePhotoshop Online Alternative is a perfect alternative to Photoshop √ You can add filters, frames, text, layers and effects √ Create an amazing photo collage, card, facebook cover, twitter cover, instagram images, youtube channel or design graphics. Archives
October 2017
Categories |
 RSS Feed
